
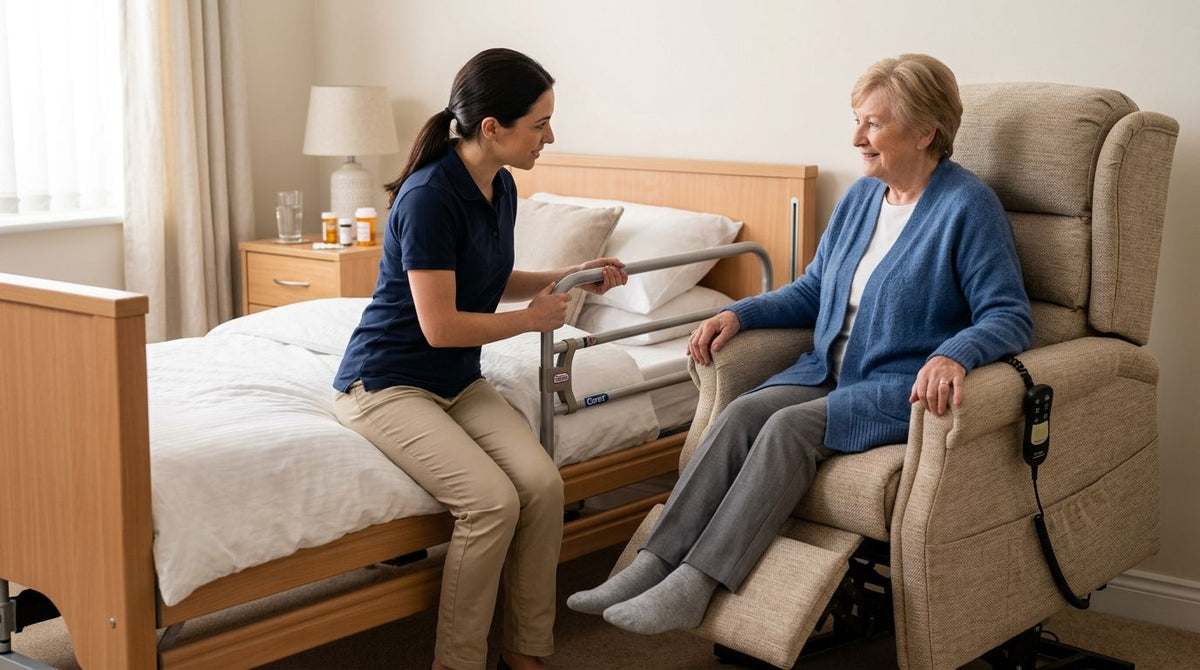
Setting up a lift chair and hospital bed rail after surgery goes wrong in one of two ways: the chair sits too far from the bed to make transfers safe, or the rail gets mounted to a frame that can't take the load. The right setup puts the chair's footrest and the bed rail's grip zone within one seated pivot — no shuffling, no reaching, no falls. Follow the sequence below and you'll have both installed and tested in under an hour.
- A lift chair and hospital bed rail setup works best when the chair sits 12-18 inches from the bed's grip zone, not against it.
- Test bed rail clamp tension before the patient's first transfer — a rail that shifts under 20 lbs of pull is a fall risk, not a support.
- Power lift recliners need a dedicated grounded outlet within cord length of the final chair position, decided before furniture moves.
- Post-surgical recovery setups fail most often on flooring transitions between bed and chair, not on the equipment itself.
Why this matters
A lift chair and a bed rail solve two different halves of the same problem: getting a recovering patient from lying to standing without strain on a healing incision or joint. Get the spacing or mounting wrong and you've built two pieces of safety equipment that fight each other.
Most home setups for post-surgical recovery get the individual products right and the geometry wrong — chair too low, rail on the wrong side of the bed, cord too short for the final position. That's the part rehab centers get trained on and home caregivers usually don't. In 2026 the equipment is cheap and plentiful; the placement knowledge is not.
Before you start
- Measure the room, not just the furniture. You need at least 3 feet of clear floor between the chair's fully reclined footprint and the bed frame — power lift recliners extend 25-30 inches further when reclined than when upright.
- Confirm the bed frame accepts a clamp-style rail. Platform beds, adjustable bases, and some low-profile frames don't expose a frame rail wide enough for standard bed rail clamps — check this before the rail arrives, not after.
- The gotcha: decide which side of the bed the patient exits from before you position the lift chair. Rails and chairs both have a dominant side, and switching it after installation means re-clamping the rail and re-routing the recliner's power cord.
Set up your lift chair position and power
- Pick the wall the chair backs against. Leave 6 inches of clearance behind the chair back for full recline — most power lift recliners need this to avoid scraping trim.
- Confirm outlet access. A dedicated, grounded outlet should sit within the recliner's cord length once the chair is in its final spot — don't rely on an extension cord for a lift motor. If your outlet layout isn't there yet, the power lift recliner outlet wiring guide covers adding one before the chair ships.
- Set the chair's lift angle to the lowest comfortable setting first. A steeper initial lift angle helps non-weight-bearing patients but strains a fresh abdominal or hip incision — start conservative and adjust after the first supervised transfer.
- Test the lift and lower cycle empty, twice, before the patient sits. Expected result: smooth, single-speed motion with no hesitation at the midpoint — hesitation there usually means the chair is on an uneven floor, not a motor fault.
Configure the hospital bed rail
- Identify the rail's mounting type — under-mattress strap, frame clamp, or bolt-through. Hospital-style bed rails almost always use under-mattress straps that run between the mattress and the platform or box spring.
- Position the rail at the point where the patient's hips sit when upright in bed, not at the head or foot of the bed. This is the pivot point for a safe transfer, and it's the single most common placement error.
- Tighten the straps or clamps to full manufacturer spec, then apply a firm downward and outward pull test — 20 lbs of pressure minimum — before anyone uses it to stand. A rail that shifts under that pull needs re-tightening or a different mounting point.
- Check rail height against the mattress surface. The top grip bar should sit 8-10 inches above the mattress for most adults — lower and the patient has to bend forward to grip it, which defeats the point after spinal or hip surgery.
Expected result: the patient can grip the rail seated, pull to standing without leaning past 30 degrees forward, and pivot directly toward the lift chair without a lateral step.
“If the patient has to lean past 30 degrees to reach the rail, the rail is mounted too low or too far from the hip line.”
Adjust the sequence when medical equipment shares the room
If the recovery setup also includes a CPAP machine or oxygen concentrator, the order changes: map the tubing path before you finalize the bed rail side, since tubing crosses the exit path on whichever side the rail sits. A setup built around an oxygen concentrator next to a lift chair puts the concentrator on the opposite side from the rail and chair exit path, with roughly 4 inches of tubing slack coiled — not stretched taut — across the transfer zone.
For adjustable bed backrests specifically, confirm the adjustable bed backrest fits your existing bed frame before mounting the rail. Some backrest brackets occupy the same frame rail space a clamp-style bed rail needs, and you'll only find out after both are half-installed.
Pick the right base under the mattress
The rail is only as stable as what it clamps to. A sagging or overly soft foundation lets a strap-mounted rail rock under load no matter how tight the strap is. For recoveries running longer than a few weeks in 2026, a base with independent head elevation removes most of the lifting work the rail would otherwise do — the patient starts a transfer already at 30 to 45 degrees instead of flat.


Verdict: Aeva Vital's adjustable bed base is the stronger choice for a post-surgical lift chair and hospital bed rail setup, because head elevation does the work a rail alone can't. Best for recoveries lasting more than two weeks.
Troubleshooting
- Chair lift motor stalls midway. Usually a floor level issue, not the motor — check for carpet compression or an uneven subfloor under the front legs.
- Bed rail rocks side to side after tightening. The mattress or foundation is too soft for a strap-mount rail. Switch to a bolt-through or frame-clamp style rail instead of over-tightening the strap.
- Patient can't reach the rail without twisting. The rail sits too far toward the head or foot of the bed. Reposition it to the hip pivot point, not the mattress center.
- Recliner cord won't reach the outlet. Don't run an extension cord for a lift motor — reposition the chair 6-12 inches or add a dedicated outlet.
- Rail blocks the bed's head articulation. Check rail clearance against the base's full incline range before final mounting; conflicts almost always appear at maximum head elevation, not at rest.
Customize your recovery setup
Once the base lift chair and hospital bed rail setup is solid, small accessories cut the remaining reach and twisting. A book holder stand on the lift chair keeps reading material at eye level without a forward lean, which matters in the first two to three weeks after abdominal or spinal surgery.
Households managing longer 2026 recoveries also add remote control for the chair itself, since reaching for a side-mounted remote undercuts a hands-free lift. If the recovery plan includes a stairlift for a two-story home, plan that install alongside the chair rather than after — the two systems compete for the same clearance and outlet capacity.
FAQ
How far should a lift chair sit from a hospital bed?
Keep 12-18 inches between the chair's footrest zone and the bed's grip rail, with at least 3 feet of clear floor for the chair's full recline footprint. Closer spacing forces a twisting transfer, which strains healing incisions.
What height should a hospital bed rail be mounted at?
Mount the top grip bar 8-10 inches above the mattress surface, positioned at the patient's hip line when seated upright. Lower placement forces a forward lean that undoes the rail's purpose after hip or spinal surgery.
Does a lift chair need a dedicated electrical outlet?
Yes, a grounded outlet within the recliner's cord length rather than an extension cord. Lift motors draw enough current that shared or extended circuits can trip or underperform.
Can a bed rail be mounted to any bed frame?
No. Platform beds and some low-profile adjustable bases don't expose enough frame rail for standard clamps, so confirm mounting compatibility before the rail arrives.
How do I test if a bed rail is safely installed?
Apply a firm downward and outward pull of at least 20 lbs before first use. Any shift or rocking means the strap or clamp needs re-tightening or a different mounting point entirely.
Should the lift chair and bed rail be on the same side of the bed?
Yes. Decide the patient's exit side before installing either one, since switching sides after setup means re-clamping the rail and re-routing the chair's power cord.
What's the biggest mistake in a post-surgical lift chair and bed rail setup?
Placing the bed rail at the head or foot of the bed instead of the hip pivot point. That single placement error causes most reported transfer difficulties at home.
Is an adjustable bed base better than a bed rail after surgery?
They solve different problems and work best together. The base raises the patient toward upright; the rail gives a fixed grip point for the final push to standing.
One last thing
The detail most 2026 home setups skip: flooring transitions. A rail and chair can both be mounted and tested perfectly and the transfer still fails if a raised threshold or rug edge sits between them — that's where falls happen, not at the equipment. Walk the exact transfer path before the patient's first attempt and remove anything that can catch a foot mid-pivot.