

Instead of improvising your sauna to cold plunge workflow each session, prepare the equipment, a dry transition area, and clear stop rules before you start. Use the infrared sauna according to its manual, leave the heat, assess how you feel, and enter cold water only when you are steady and breathing normally—not because a timer tells you to.
By Editorial Team
- Aeva Vital home wellness equipment suits buyers planning separate infrared sauna and cold plunge stations.
- A sauna to cold plunge workflow needs a dry transition area and an easy exit from both stations.
- Use model instructions and medical guidance—not a universal temperature or duration prescription.
- Tub capacity does not establish chiller compatibility, sanitation requirements, or suitability for your floor.
Why this matters
Heat and cold create different demands on your body. Cold-water immersion can cause an involuntary gasp, rapid breathing, and changes in heart rate and blood pressure; feeling comfortable in the sauna does not establish that you are ready for immersion.
The transition is a decision point, not a race. A home routine needs an option to stop after the sauna, skip the plunge, or end the session entirely. Neither sweating heavily nor tolerating colder water proves that a session is better.
For a 2026 home installation, start with the equipment footprint and operating requirements. The two-person infrared sauna guide provides a separate equipment-selection starting point; this guide covers how to organize the sequence without treating it as a medical protocol.
Before you start
- Equipment and instructions: Have the sauna and plunge manuals, a water thermometer suitable for the tub, towels, drinking water, and stable access to both stations. Confirm electrical, placement, drainage, and maintenance requirements before filling or powering equipment.
- Health and supervision: Discuss heat and cold exposure with a clinician if you have cardiovascular disease, blood-pressure problems, a history of fainting, pregnancy, or medication-related concerns. Do not combine the routine with alcohol, and do not plunge alone.
- The overlooked gotcha: A tub's gallon rating is not a floor-load approval. Water, the tub, and the person all contribute to the installed load; have the location assessed when its suitability is uncertain, especially above ground level.
Set up an accessible exit before planning immersion. If you need to climb over a high side without dependable support, change the layout or equipment rather than accepting an awkward exit.
At-a-glance equipment comparison
Aeva Vital offers infrared sauna and cold plunge equipment for home wellness setups. These specifications identify different planning questions; they do not establish a safe heat-and-cold prescription.
| Equipment | Supplied specification | Best for | Planning advantage | Limitation |
|---|---|---|---|---|
| Low EMF 2-Person Hemlock Far-Infrared Indoor Sauna with Double Glass Doors | 2-person design; seven far-infrared heating panels | Buyers considering an indoor sauna station | Stated occupancy and panel count help identify the configuration | Panel count does not prove uniform body heating; the title supplies no installation dimensions |
| Portable Inflatable Ice Bath Tub | Cold Water Therapy for Athletes | 76.6 Gallon | 76.6-gallon capacity; inflatable construction | Buyers considering a portable plunge station | Portable construction offers a different setup approach from a fixed installation | Capacity does not establish usable immersion depth or chiller connections |
| 79 Gallon Cold Plunge Tub | All-Season Outdoor Ice Bath | Thermo Lid Included | 79-gallon capacity; thermo lid included | Buyers considering an outdoor plunge station | The supplied title identifies outdoor positioning and an included lid | Outdoor positioning does not establish site-specific freeze protection or electrical requirements |
The 76.6-gallon and 79-gallon ratings are capacity labels, not prescribed fill levels. Follow the tub instructions for filling and leave room for displacement when you enter.
Sauna to cold plunge workflow: station configuration
Equipment placement
- Confirm the installation location. Read the sauna's indoor-use requirements and the tub's placement instructions. Keep water away from equipment that is not designed for wet conditions.
- Check the power arrangement. Have a qualified electrician assess the circuit, outlet, and required protective devices when necessary. Do not assume the sauna and any plunge accessories can share a circuit.
- Plan drainage. Identify where drained water will go before filling the tub. Keep hoses and drainage paths out of walking routes.
- Check entry and exit. Open the sauna door fully and practice entering and leaving the empty tub. Use only access supports intended for that purpose.
- Leave service access. Keep the areas specified in the manuals accessible for cleaning, inspection, and any equipment maintenance.
Expected result: Both stations are installed according to their instructions, with a clear walking route and an exit you can use without improvising.
For your 2026 layout, distinguish the tub's external footprint from its stated water capacity. The cold plunge tank-capacity guide addresses that separate selection question. Do not select a tub by gallons alone.
Transition area
- Create a dry landing area. Place an appropriate slip-resistant surface outside the wet zone. Keep edges flat and the walking route unobstructed.
- Position a stable seat. Put it outside splash range so you can pause after leaving the sauna without standing beside the tub.
- Stage towels and water. Keep them within reach without blocking a door or requiring you to step across a hose.
- Agree on stop rules. Tell your supervising companion that dizziness, chest discomfort, unusual shortness of breath, or loss of coordination ends the session.
Expected result: You can leave the heat, sit if needed, and choose whether to continue without crossing a cluttered or slippery area.
The transition area belongs in the workflow even when the stations are close together. Proximity saves walking distance; it does not eliminate the need to assess symptoms.
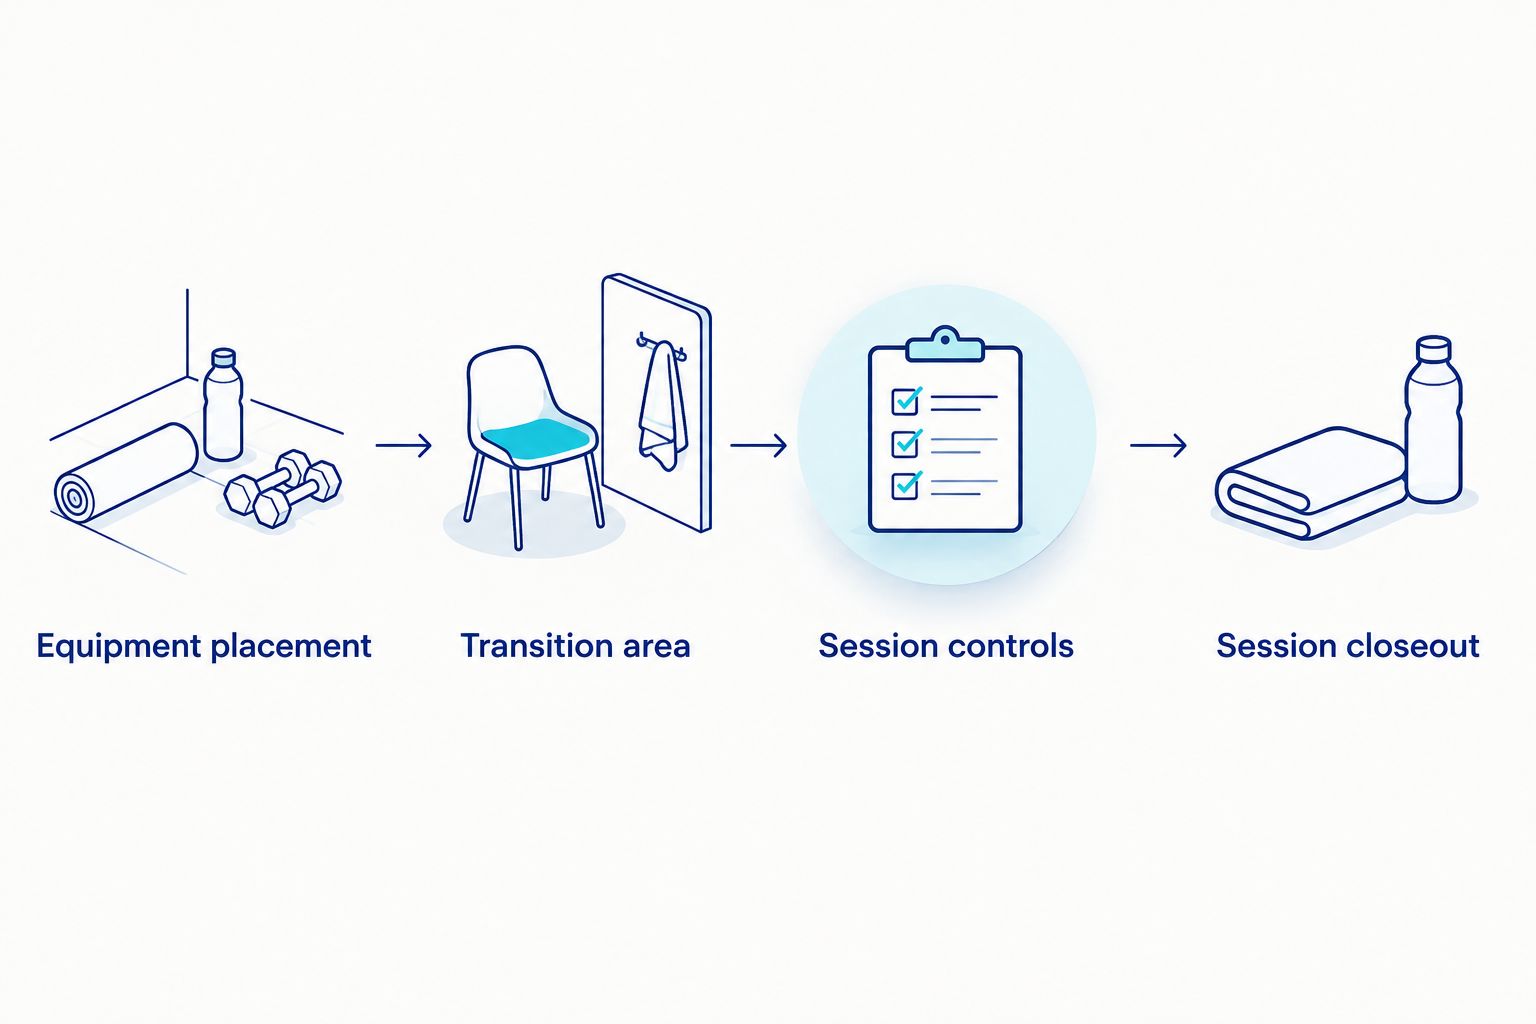
Session controls
- Check both stations before heating. Inspect the sauna as its manual directs. Confirm that the plunge water and tub are ready for use, including required cleaning and water treatment.
- Record the actual conditions. Note the sauna setting and measured water temperature. Use the equipment's own control labels; settings and displays differ by model.
- Follow your permitted heat exposure. Use the sauna manual and any clinician-specific restrictions. Leave immediately if you feel unwell rather than completing a planned duration.
- Pause outside the sauna. Stand or sit safely and assess balance, breathing, and comfort. Do not enter cold water while dizzy, nauseated, or unusually breathless.
- Enter only when ready. Use a controlled entry with your companion present. Keep your head above water and do not use deliberate hyperventilation or breath-holding.
- Exit when symptoms or your limit require it. Do not stay in to complete an arbitrary target. Exit with assistance if needed; seek urgent help for chest pain, fainting, severe breathing difficulty, or confusion.
Expected result: You complete only the parts of the session you tolerate within your instructions and restrictions. Stopping before the plunge is an acceptable outcome.
For a 2026 session record, keep temperature, exposure duration, symptoms, and maintenance notes separate. A controller setting documents what you selected—not your core temperature, hydration status, or physiological response.
Session closeout
- Dry off and move to a comfortable environment. Use dry clothing and towels. Do not use an immediate return to intense heat as a remedy for feeling unwell after cold exposure.
- Check that you feel steady. Stay with your companion until your balance, breathing, and comfort have settled. Persistent or worsening symptoms require medical attention.
- Shut down equipment as instructed. Follow the manual for sauna shutdown and any tub accessories. Do not disconnect wet electrical equipment with wet hands.
- Complete the maintenance routine. Follow the tub's water-care instructions and the sauna's cleaning instructions. Record any issue before the next session.
Expected result: The equipment is left in its required condition, the walking area is dry, and the next session starts from a checked setup rather than yesterday's assumptions.
Product specifications: what they do and do not prove
The listed Aeva Vital home wellness equipment supplies useful starting specifications. The seven heating panels in the named two-person sauna describe its heater configuration; they do not establish a recommended session length or prove a medical outcome.
Likewise, the inflatable tub's 76.6-gallon capacity describes a volume rating. It does not establish a user's fit, a filled installation's structural suitability, or the ability to maintain a selected temperature.
The outdoor tub's 79-gallon rating and included thermo lid identify capacity and an accessory. A lid does not replace water treatment, child-access precautions, or the manufacturer's weather instructions.
Check the installation manual before choosing the location. For a 2026 equipment purchase, resolve dimensions, electrical requirements, drainage, entry height, and maintenance responsibilities before assembling a hot-and-cold station.


Second variant: sauna followed by room-temperature rest
Best for: users who choose not to add cold immersion. A sauna-to-rest workflow keeps the installation, transition, and closeout stages but removes the plunge stage. Its advantage is a simpler sequence; its limitation is that heat exposure still requires its own precautions.
| Workflow | Best for | Advantage | Limitation |
|---|---|---|---|
| Sauna, assessment, then optional plunge | Users cleared for both heat and cold exposure | Includes both stations with a decision point between them | Adds cold-water risks, supervision, and water-care responsibilities |
| Sauna, assessment, then room-temperature rest | Users omitting cold immersion | Removes the cold-water stage and wet entry | Does not remove sauna-related risks |
- Follow the sauna instructions and your individual restrictions.
- Leave the sauna and use the dry transition area.
- Rest in a comfortable room-temperature environment and drink water as appropriate.
- Complete the sauna shutdown and cleaning routine.
Expected result: You finish a heat-only session without treating the missing plunge as an incomplete workout. Do not substitute this version when a clinician has advised you to avoid heat itself.
Troubleshooting
- You feel dizzy after leaving the sauna. Do not plunge. Sit or lie down safely with assistance, stop the session, and seek medical assessment for persistent symptoms or urgent help for severe symptoms.
- Cold entry triggers gasping or uncontrolled breathing. Exit promptly with assistance. Do not try to solve the problem with breath-holding, deeper immersion, or another attempt during the same session.
- The transition floor gets wet. Stop using the route until it is dry. Reposition towels, manage drips, and correct drainage without moving electrical equipment into splash range.
- The tub water looks clear but maintenance is overdue. Follow the specified water-care procedure before use. Clear water alone does not establish microbiological safety.
- A breaker trips or an electrical connection gets wet. Stop using the affected equipment. Do not repeatedly reset the breaker; have the installation assessed and follow the manufacturer's service instructions.
Customize your workflow
Expand the setup by improving access and maintenance—not by automatically increasing exposure. Keep towels in a dedicated dry location, organize water-care supplies away from children, and assign shutdown responsibilities when several adults share the stations.
For your 2026 checklist, record changes in equipment, placement, and personal restrictions. Reassess the workflow after a move or replacement rather than carrying the previous settings across unchanged.
A useful routine is repeatable without being compulsory. Keep the option to stop visible in your checklist, and never make completing both stations the measure of success.
Related guides
FAQ
What is a sauna to cold plunge workflow?
A sauna to cold plunge workflow organizes equipment preparation, sauna use, a transition assessment, optional cold immersion, and shutdown. The cold-water stage is conditional, not an automatic next step.
Should I enter the cold plunge immediately after an infrared sauna?
Do not treat immediate cold entry as a requirement. Leave the sauna, assess your balance and breathing, and skip immersion if you feel unwell or your clinician has advised against it.
How long should I stay in the sauna and cold plunge?
There is no single duration that is safe for everyone. Follow each equipment manual and individual medical guidance, and end exposure sooner if symptoms occur.
What water temperature should I use for a cold plunge?
A suitable water temperature depends on your health, experience, and equipment instructions. Measure the actual water temperature and do not choose a colder setting simply to intensify the session.
Can I use a cold plunge by myself at home?
Do not plunge alone. Have a capable companion present who can help you exit and obtain emergency assistance if needed.
Does a 79-gallon tub need to be filled with 79 gallons?
The 79-gallon rating is not a required fill amount. Follow the manufacturer's fill instructions and account for water displacement when you enter.
Can I connect a chiller to any inflatable ice bath?
Do not assume an inflatable ice bath accepts a chiller. Verify the manufacturer's connection, flow, electrical, and compatibility requirements before adding one.
Does sauna followed by cold immersion guarantee better recovery?
Sauna followed by cold immersion does not guarantee better recovery. Equipment capacity and heater specifications do not prove a medical or training outcome.
One last thing
Practice leaving the empty tub before you fill it. An exit that feels awkward while you are dry is a layout problem to resolve before heat, cold, or wet surfaces complicate it.